
> STROPPING BLOCKS
> MAKING HOOKS > MAKING A LADDER > MAKING BASKETS MUSEUMS LINKS ABOUT ME
Depending on the time period of the ship you're building, you may need to rope-strap your blocks. This can be a bit frustrating because the blocks are often so tiny. In the photos below, I present one method of stropping blocks that works for me. You may try it and decide you like it or you may well discover a method that works better for you.
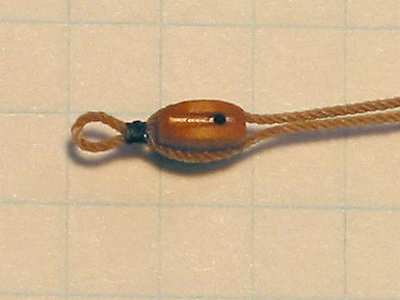
In the example shown in the photos below, I'm stropping a 5mm block, which is fairly large at 1:48. Each square of the graph paper is 1/4". I've included a hook on one end and formed a becket on the other end. Beckets were formed in two ways. One involved seizing an eye on the block (as for a hook but without the hook) and the other was by simply leaving the strap a bit long at one end of the block (the method I show here). A line of some sort will be attached to the becket for use in the running rigging. You'll need to simulate an eye splice in this line. Not all blocks have beckets, of course - those that don't are a bit easier to strap. In addition, there are several other types of stropping, depending on the rigging requirement. I recommend you acquire a copy of James Lees' The Masting and Rigging of English Ships of War 1625-1860. It seems to have the greatest amount of information.
Not all blocks have hooks but blocks are often attahced to eyebolts in the deck or elsewhere. In that case, simply substitute a ring for the hook. As you will see, I have shown the hook here in brass just to increase the contrast between the various parts of this assembly for the photos. But, of course it would normally be blackened to simulate iron.
This method does not produce stropped blocks that are 100% historically accurate. For me, it's a reasonable approximation at this scale. There is also the consideration of whether the straps should be served. There does not seem to be a universal rule for this. Darcy Lever , in The Young Sea Officer's Sheet Anchor indicates that straps were always served. James Lees, on the other hand, says,
"As regards the question of whether to serve the straps of the blocks or not, there are two trends of thought — some like to serve them to keep the weather out of the strap, while others like to leave the strap unserved so that any signs of wear or rot are visible."
Clearly, serving straps at this scale increases the difficulty of the job and is something I'll leave to others.
 |
Photo 1: In real practice, a strap of the type shown in this example was a rope spliced into a continuous circle. The strap was placed around the block and seized at one or both ends to form a becket, attach a hook or eye, etc. Seizing is made from very thin line that is wrapped around the strap between the block and the hook. It's possible to make rope circles for models exactly the way it's done in real practice but the smaller the blocks and the smaller the scale, the more difficult it becomes. So, I simulate the strap with a simple piece of line. The larger the block, the thicker the strap should be. The first step in simulating a strap is to run the line that will form the strap thru the eye of the hook, creating a loop for the block. |
 |
Photo 2: If the block requires a becket that is not seized, slip a thin piece of wire or a pin under the strap at the end of the block opposite the hook. The size of the wire depends on the size of the block and the line that will be attached to the becket. You'll have to work this out for yourself, but generally, you want the hole in the becket just slightly larger than the line that will run through it - typically about the same size as the sheave hole in the block. If you want a seized becket, form it first by simply seizing a small loop in the rope, then use that rope for the strap. While you hold the strap in place with your fingers, pulling the pin up tight against the block, touch the line at the becket end of the block with a small drop of thin CA or diluted white glue. This will hold the strap to the block and permanently form the becket. When the glue is dry, you can remove the pin. It should twist out easily. |
 |
| Photo 3: This image shows a block with a seized becket. Also note the position of the sheave hole. The hook (which will be added in the next step) will be at the same end of the block as the sheave hole. |
 |
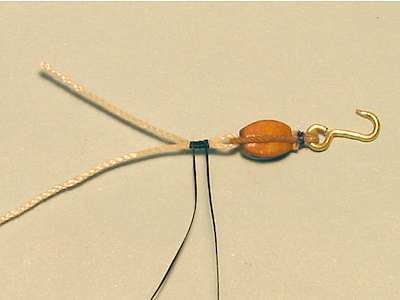
| Photo 4: Here, the block has been clamped in the jaws of a third-hand device. Note that the excess stropping line holding the hook has been routed back along the side of the block. The end of the line that does not go into the hook runs forward along the hook so it can be held by the jaws. You need to leave some space between the block and the eye of the hook for the next step. |
 |
Photo 5: For seizings, I prefer 3/0 fly-tying thread. This type thread can be slippery because it's made from nylon. You can run the thread through a cake of beeswax first if you like to make the thread stickier. Make sure you remove any excess wax from the line by running it through your fingers several times. I first tie an overhand knot around the strap (all 3 pieces of line) between the block and the hook, as close to the block as possible, pulling it tight. Then I use one end of the thread to wrap a few turns around the strap and finish up with a half hitch. Note that in this photo, I am using black thread for the seizing. Normally, I would use tan to match the color of the strap, but for the photos, I wanted to increase the contrast between the various parts of the assembly. Here, the block is removed from the third-hand device so you can see all the parts. The excess ends of the stropping line are below the block to the left and running forward along the hook. You can also see the black thread used for the seizing. Before cutting the lines and threads off, touch them with a tiny amount of thin CA or diluted white glue to harden them, making it easier to cut them. Also shown in the picture is the tool I use for applying small amounts of CA to line and thread. It's just a needle with half the eye cut off. You can glue the other end of the needle into a dowel or old paint brush handle. The eye will get clogged up with dried CA from time to time. Simply hold the end of the needle in the flame of a match or candle and the glue will burn away in an instant. Wipe the soot off the needle before dipping it in glue again. You don't need to soak the whole block in CA - just enough of the threads to harden them so they are easier to cut off. You will discover that fly-tying thread is made up of many, very thin filaments. You'll want to pull the thread taut while you apply the CA to make sure the filaments are all together. As mentioned above, you can also use diluted white glue. Some modelers dislike using CA because it can make things brittle and perhaps prone to breakage. I haven't had any problems with it myself. Frankly, I don't care if my models are still around 100 years from now. I've used white glue and it works fine and is a more flexible but it takes longer to dry. Bottom line, suit yourself. |
 |
Photo 6: The completed block. I use cuticle snips to cut off the excess lines so I can get in really close. Scissors just don't seem to cut close enough. Some modelers use fingernail clippers. This is one point where you can easily screw up your hard work to this point. You want to cut the threads off close enough so they become invisible but if you go too far, you'll cut the seizing and it will unravel. Takes a bit of practice. |
 |
Photo 7: The reason for a becket is because there will be a piece of running rigging of some sort eye spliced to it. Exactly how this rigging will be used varies with the application and, again, some blocks use seized beckets and some have the rigging line just running under the strap. I'm just showing a general example here. Note too that I've used white line for the running rigging. This would normally be tan colored but, again it's done here to increase contrast. In this photo, I've run the running rigging line thru the becket and am holding it in the jaws of the third-hand device. |
 |
Photo 8: You want to get a fair amount of tension between the two jaws to make it easier to tie the thread around the line to make the seizing. As you did with the hook seizing, you'll use fly-tying thread. Once again, I've used black thread here to increase contrast but it would normally be tan to blend with the running rigging line. Make an overhand knot near the becket but not right next to it. I like to leave some space here because we're attempting to simulate an eye splice. Then, wrap one of the threads around the line two or three times and finish up with a half hitch. Apply thin CA to the free ends of the thread and the free end of the rigging line. |
 |
| Photo 9: The completed assembly. Cut the excess line off and you're done! |
 |
|
Copyright © 2021 - John H. Earl
All Rights Reserved.
Problems with the site? Contact the Web Master
Last Updated:
April 3, 2021